In this post I want to share my knowledge and experience of installation of oracle E-business suit 12.2.7 with Grid Infrastructure 12.1 on oracle linux 7.4 operating system with the help of Oracle virtual box 5.2.6.
Software Required :
- Oracle Grid Infrastructure 12c(12.1.0)
- Oracle E-business suit R12.2.7
- Oracle Linux 7.4 (Operating System) ISO image required to download.
- Oracle Virtual Box 5.2.6
Installation process is explained step by step
1-Create Virtual Machine
Download and install package - VirtualBox-5.2-5.2.6_120293_el7-1.x86_64.rpmopen System tools in Application menu and open Oracle VM Virtual Box
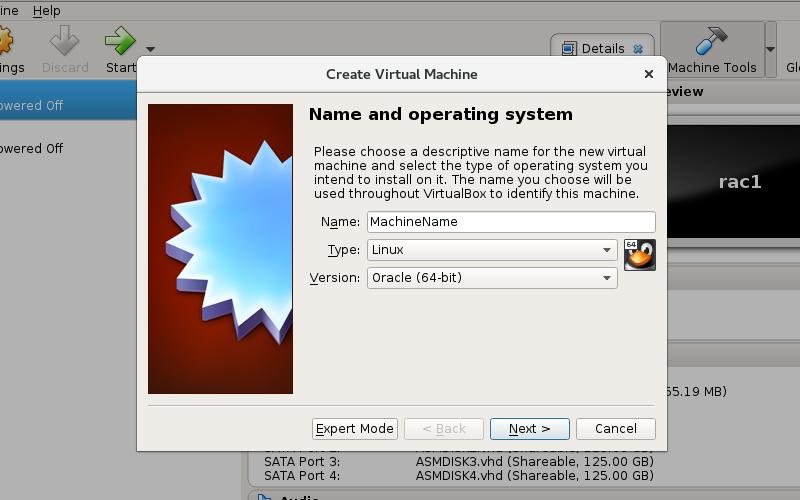
specify virtual machine name and select operating system and type.
press the next button and complete the process.
I create 250 GB storage space and 6 GB RAM to virtual machine rac1.
shared storage space is additional from this storage space that will be required for creating shared storage for ASM and RAC configuration.
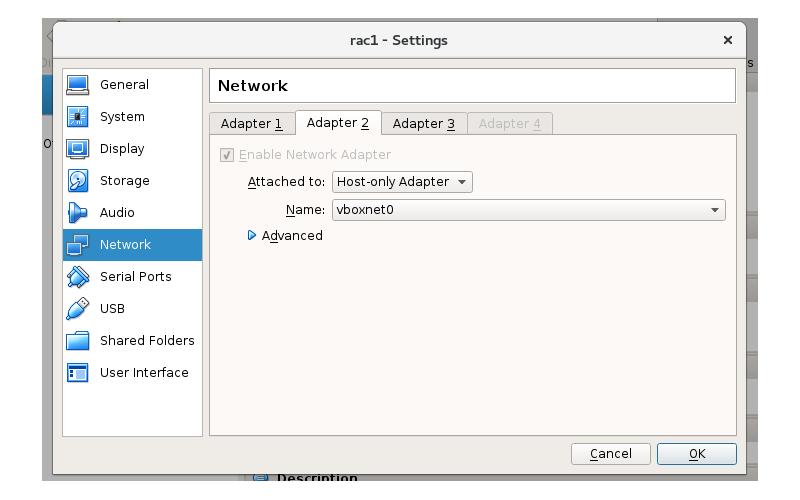
configure the network interface adapters for RAC environment. Three adapters are configured. one for internet , one for public IP and one for private IP for RAC to RAC communication.


2- Oracle linux 7.4 installation
Download oracle linux 7.4 ISO image from oracle website and make a boot able DVD and use it for oracle linux installation.in case of using boot able usb plpbt.iso is required which is easily available from net.
insert DVD drive or attach boot able usb. oracle linux 7.4 installation process will start.
I specify my machine name as rac1 and domain is localhost.
swap space should be equal or greater than available system RAM. this my case 6 GB swap space was configured.
after installing oracle linux following rpms must be available before start oracle E-business suit installation.
see the note in oracle documentation
Document 1330701.1, Oracle E-Business Suite Installation and Upgrade Notes Release 12 (12.2) for Linux x86-64.html
E-Business Suite Pre-Install RPM (available for Oracle Linux 5, 6 and 7)
(The E-Business Suite pre-install package (oracle-ebs-server-R12-preinstall) for Oracle Linux 5, 6 and 7 is available on the Oracle Unbreakable Linux Network (ULN, which requires a support contract) or from the Oracle public yum repository (under the 'Add-ons' channel) for these Oracle Linux operating systems. It is recommended that this x86_64 rpm be installed on top of a 'minimal' install of Oracle Linux to provide just the necessary packages to install and run Oracle E-Business Suite.As with the Oracle RDBMS Pre-Install RPMs, this package installs all required E-Business Suite RPM packages for both the application and database tiers while configuring the environments with particular kernel and other values to meet most of the requirements published in this document. )
it is oracle recommended that you install oracle-ebs-server-R12-preinstall from yum. it will set kernel parameters and other configurations for E-business suit installation and create users and groups as well.
following users and groups will be created automatically.
User
oracle
Groups
dba
oinstall
I use oracle user for all installation for simplicity.
otherwise we need to install following rpms manually.
- compat-libstdc++-296-2.96-144.0.2.el7.i686
- openmotif21-2.1.30-11.EL7.i6861
- xorg-x11-libs-compat-6.8.2-1.EL.33.0.1.i386
- libXrender-0.9.8-2.1.el7.i686
- perl-File-CheckTree-4.42-3.el7.noarch
- binutils-2.23.52.0.1-16.el7.x86_64
- compat-libstdc++-33-3.2.3-71.el7.i686
- gcc-4.8.2-16.el7.x86_64
- gcc-c++-4.8.2-16.el7.x86_64
- gdbm-1.10-8.el7.i686
- gdbm-1.10-8.el7.x86_64
- glibc-2.17-55.el7.i686
- glibc-2.17-55.el7.x86_64
- glibc-common-2.17-55.el7.x86_64
- glibc-devel-2.17-55.el7.i686
- glibc-devel-2.17-55.el7.x86_64
- libgcc-4.8.2-16.el7.i686
- libgcc-4.8.2-16.el7.x86_64
- libstdc++-devel-4.8.2-16.el7.i686
- libstdc++-devel-4.8.2-16.el7.x86_64
- libstdc++-4.8.2-16.el7.i686
- libstdc++-4.8.2-16.el7.x86_64
- libXi-1.7.2-2.1.el7.i686
- libXp-1.0.2-2.1.el7.i686
- libXp-1.0.2-2.1.el7.x86_64
- libXtst-1.2.2-2.1.el7.i686
- libaio-0.3.109-12.el7.i686
- libaio-0.3.109-12.el7.x86_64
- libgomp-4.8.2-16.el7.x86_64
- make-3.82-21.el7.x86_64
- redhat-lsb-4.1-24.0.1.el7.x86_64
- sysstat-10.1.5-4.el7.x86_64
- util-linux-2.23.2-16.el7.x86_64
- compat-libcap1-1.10-7.el7.x86_64
- compat-libstdc++-33-3.2.3-71.el7.x86_64
- elfutils-libelf-devel-0.158-3.el7.x86_64
- libaio-devel-0.3.109-12.el7.i686
- libaio-devel-0.3.109-12.el7.x86_64
- xorg-x11-utils-7.5-13.1.el7.x86_64
- oracleasm-support
- oracle-rdbms-server-11gR2-preinstall.x86_64 (for startCD versions prior to 51 which included 11gR2)
- oracle-rdbms-server-12cR1-preinstall.x86_64 (for startCD versions 51 or higher)
2.1 network interface configuration
Three network interface card will be configured withEthernet (enp0s3)
Ethernet (enp0s8)
Ethernet (enp0s9)
assign the ip address to the ethernet cards .
the upper right corner shows the network icon.click on it and select Ethernet(enp03) and click on setting icon on down right corner.
Ethernet(enp0s3)


Ethernet(enp09)

2.2- hosts file configuration
/etc/hosts file must contain all ip address used in RAC configuration.
2.3 - DNS configuration
DNS (Domain Name Server) configuration is the important element of RAC installation and configuration. several methods are available for DNS configuration.i use dnsmasq to configure the DNS . the functionality of DNS is to resolve the appropriate ip address of specific name.
configure the DNS as mentioned below.
2.3.1 - install dnsmasq from yum repos.
# yum install dnsmasq
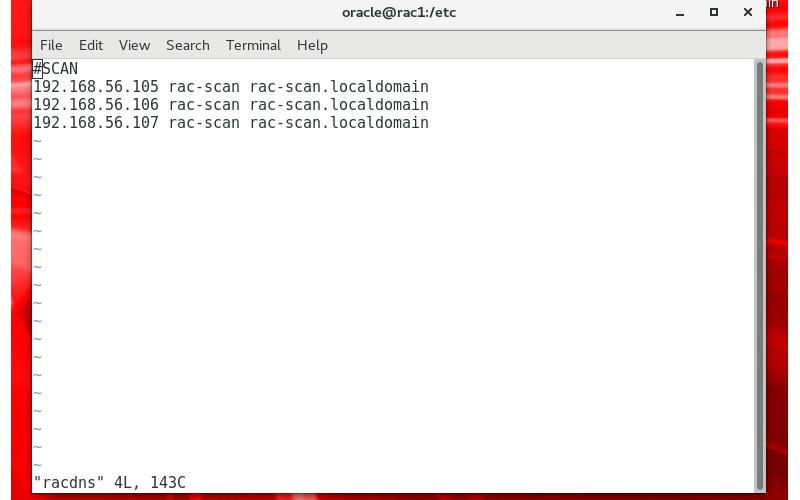
2.3.2- create one file racdns in /etc directory
# touch /etc/racdns --this command will create racdns file in etc
edit this file with the following detail

edit /etc/resolv.conf file and put these two entries in that file.
nameserver 127.0.0.1
search localdomain
nameserver 192.168.56.101
2.3.5- make resolv.conf write protected
after restarting resolv.conf is updated. to prevent it from update make it write protected with the following command.
chattr +i /etc/resolv.conf
now DNS has been configured. start dnsmasq service with the following command
[root@maindb etc]# systemctl start dnsmasq.service
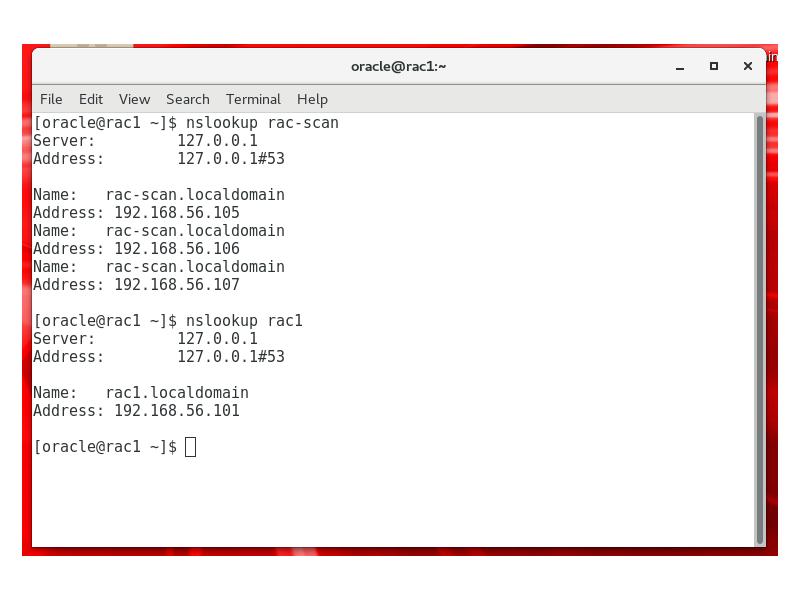
chkconfig dnsmasq on2.3.5- check DNS configuration.
after completion of DNS configuration it must resolve ip address of machine when we run nslookup command. out put should be like this
2.4 - set limits in /etc/security/limits.conf file
set the limits in /etc/security/limits.conf fileoracle soft nofile 1024 oracle hard nofile 65536 oracle soft nproc 16384 oracle hard nproc 16384 oracle soft stack 10240 oracle hard stack 32768 oracle hard memlock 134217728 oracle soft memlock 134217728
Now this machine is ready to start installation. we will make a clone of this machine to create a cluster of two nodes.
3- Clone
open VM Virtual Box Manager and open the machine mennu.select clone option and create a new identical clone machine with new name.

create it with rac2 name for a node in cluster.
it will take a while to create rac2 machine.
after a successful clone , make following changes in rac2 machine
3.1- change host name in /etc/hostname file
# vi /etc/hostname
chang hostname with rac2.localdomain and save the file.
3.2- change ip address of network interface.
Ethernet (enp0s3)
Ethernet (enp0s8)
Ethernet (enp0s9)
Ethernet(enp0s3) no need to change.
ip address of Ethernet (enp0s8) will be changed with 102 for last section.

ip address of Ethernet (enp0s9) will be changed with 102 for last section.

4- SSH connectivity between RAC nodes.
password less connectivity must be created among all the nodes involve in cluster.this is a public key authentication for a password less connectivity.
we can create it in the following way.
start the virtual machines.
login as oracle user
create a public key with the following command.
just run this command
$ ssh-keygen
and press enter
do not enter any value. your output should be like shown below.

copy public key to rac2 machine with the following command.
$ ssh-copy-id -i /home/oracle/.ssh/id_rsa.pub oracle@rac2.localdomain:
following out put will be shown

after copy id_rsa.pub key on rac2 node password less connectivity will be created from rac1 to rac2.
Do the same procedure from rac2 to rac1 password less connectivity.
generate ssh-key on rac2 node and copy it on rac1.
after successful completion both nodes should be accessable with out password.
for example

5- Create share storage drives.
5.1 -share storage drives are used for oracle ASM. we will create it on one machine and make it share able and access able from all machines in a cluster.here we create the share storage.
if virtual machine is running power off it and create the share storage in the following way.
open VM Manager > select rac1 > select storage

press the green plus button

select create new disk


select size of disk and store it where you have enough space to accommodate it.

one disk will be created

repeat this procedure to create disk and create four disks for external ASM storage redundancy.
then make the all disks share able for all nodes in cluster.
we will make it share able in the following way.
open file > select virtual media manager

make all the disks as shareable.
now make these shareable disks accessable to the rac2 machine.
select rac2 > storage >
select green plus to create a storage disk.

select choose existing disk

repeat this step four times to make access able all share disks for rac2 machine.
5.2- Create ASM storage disks
check if oracleasm-support rpm is installed
#rpm -qa | grep oracleasm-support
if this is not installed then install from public yum on both machines.
# yum install oracleasm-support
configure oracle asm dirver
configure on both nodes

create independent disks from shareable disks with the blow showing commands

repeat it four times to create four independent disks for sdb,sdc,sdd,sde.
5.3- create oracleasm lib disks from these shareable disks for asm storage.

create all four asm disks step by step.
Important Note:
ASM disks will be created on rac1 node only. from other nodes it will be accessable by asm scandisks command.
after successful completion of oracleasm createdisk, asm disk should be accessable from both nodes with asmlist disks.

edit /etc/fstab file and add this entry in file.
/dev/shm /tmpfs rw,exec 0 0
6- Grid infrastructure Installation.
Now rac1 and rac2 machines are ready to install Grid infrastructure on these tow machines. unzip two files in a folder and login as oracle user.run runInstaller command.


system is showing warning message because I mention a simple password for grid administration so it is ignore able.


system show some warning messages , cvuqdisk rpm is available with grid infrastructure software when we unzip, install this rpm and other warnings can be ignore because we are not using any device to ASM. ignore these warnings.


when complete , return to main screen and press ok button.

check grid services with these commands


7-E-business suit installation
After completion of Grid infrastructure, rac1 and rac2 nodes are ready to install Oracle E-business suit .I used Oracle E-business suit R12.2.7 , which is available on oracle e delivery cloud.
downloads complete package, it require 65 GB space to down loads and 45 GB additional space is required to make stage area.
After downloading the E-business suit follow these steps to install it on a cluster.
7.1- Create Stage
# mkdir stage1227
#chmod -R 775 stage1227
As root user unzip folder V100052-01_1of3.zip,V100052-01_2of3.zip,V100052-01_3of3.zip
startCD folder will be created where we unzip these folders.
open startCD/Disk1/rapidwiz/bin
# ./buildStage.sh

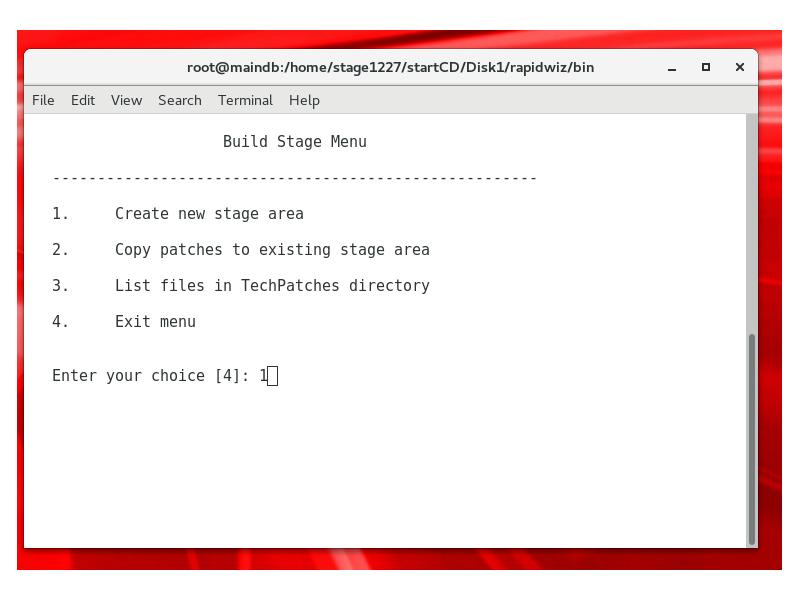
after successful completion of stage area following folders will be created in stage1227 folder
EBSInstallMedia startCD TechInstallMedia TechPatches
For simplicity and demonstration, oracle user is the owner for database and apps tier and database and apps home are installed on single machine rac1.
rac2 is only the cluster node.
As a oracle user start ./rapidwiz under /startCD/Disk1/rapidwiz
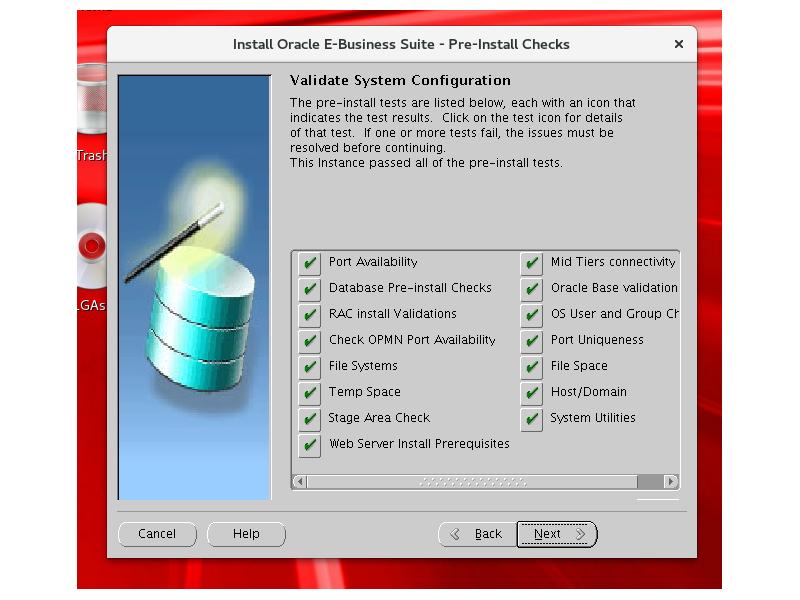
E-business suit installation will begin


select database base directory where database software will install.
select data files directory which we already configured for ASM.
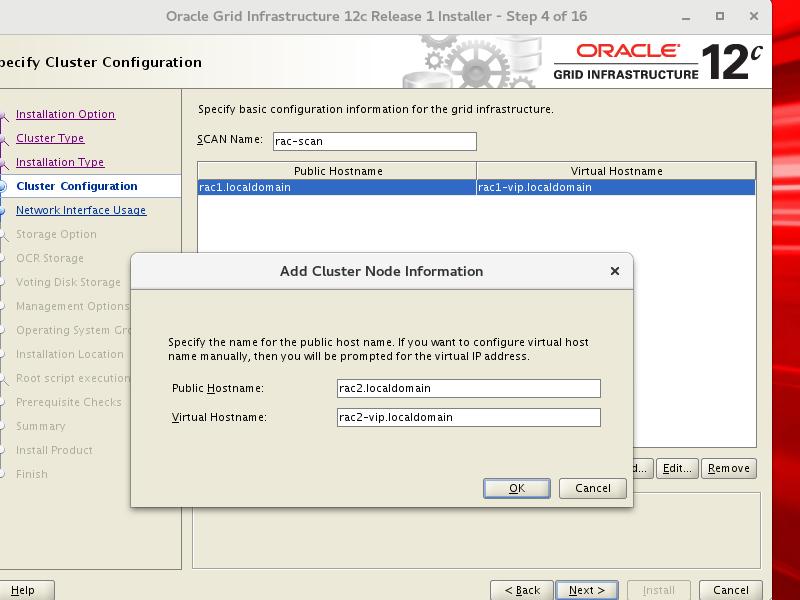
select RAC option and press RAC nodes for installation in RAC environment.
select RAC node on small screen and press select.
press next on main screen.


change user and installed group for apps tier.
we can make a different user for apps tier But in this example I used same user and group, which is used for database installation.


press next


don't worry about these error messages.
just do these steps to configure it properly.
delete already created domain with this command.
run the adProvision.pl script which is located under $AD_TOP/patch/115/bin and delete failed EBS domain as
- [oracle@rac1 bin]$ perl adProvisionEBS.pl ebs-delete-tech -contextfile=/home/ebhome/oracle/PROD/fs1/inst/apps/PROD_rac1/appl/admin/PROD_rac1.xml -techtype=wls
Enter the WebLogic AdminServer password:
- [oracle@rac1 bin]$ perl adProvisionEBS.pl ebs-deploy-alltech -contextfile=/home/ebhome/oracle/PROD/fs1/inst/apps/PROD_rac1/appl/admin/PROD_rac1.xml
Enter the APPS Schema password:
Enter the WebLogic AdminServer password:
Starting with creation of the domain...
Created the domain successfully.
drw- AdminServer
drw- oacore_server1
drw- forms_server1
drw- oafm_server1
drw- forms-c4ws_server1
Proceeding with deployment of the E-Business Suite domain..
Starting up the Admin server for deployment..
Starting up the Node Manager...
when create the domain you will run this kind of output.
run autoconfig on apps tier and press retry button on the post installation check screen.


open E-business suit home page and login as sysadmin.


open application manager.
open Application Dashboard
under the host you can see two nodes rac1,rac2.
This is the procedure to install E-business suit with real application cluster.
Thank You

